Installation with VScode extension on MacOS/Linux
Step 1. Install Prerequisites
In order to use ROGO_ESP32_WILE_SDK with the WILE ESP32 device, you need to install some software packages based on your Operating System. This setup guide helps you on getting everything installed on Linux and macOS based systems.
For Linux Users
To compile using ROGO_ESP32_WILE_SDK, you need to get the following packages. The command to run depends on which distribution of Linux you are using:
Ubuntu and Debian:
sudo apt-get install git wget flex bison gperf python3 python3-pip python3-venv cmake ninja-build ccache libffi-dev libssl-dev dfu-util libusb-1.0-0
CentOS 7 & 8:
sudo yum -y update && sudo yum install git wget flex bison gperf python3 cmake ninja-build ccache dfu-util libusbx
CentOS 7 is still supported but CentOS version 8 is recommended for a better user experience.
Arch:
sudo pacman -S --needed gcc git make flex bison gperf python cmake ninja ccache dfu-util libusb
Note
CMake version 3.16 or newer is required for use with ROGO_ESP32_WILE_SDK. Run “tools/idf_tools.py install cmake” to install a suitable version if your OS versions does not have one.
If you do not see your Linux distribution in the above list then please check its documentation to find out which command to use for package installation.
For macOS Users
ROGO_ESP32_WILE_SDK uses the version of Python installed by default on macOS.
Install CMake & Ninja build:
It is strongly recommended to also install ccache_ for faster builds. If you have HomeBrew_, this can be done via
brew install ccacheorsudo port install ccacheon MacPorts_.
Note
If an error like this is shown during any step:
xcrun: error: invalid active developer path (/Library/Developer/CommandLineTools), missing xcrun at: /Library/Developer/CommandLineTools/usr/bin/xcrun
Then you need to install the XCode command line tools to continue. You can install these by running xcode-select --install.
Apple M1 Users
If you use Apple M1 platform and see an error like this:
WARNING: directory for tool xtensa-esp32-elf version esp-2021r2-patch3-8.4.0 is present, but tool was not found
ERROR: tool xtensa-esp32-elf has no installed versions. Please run 'install.sh' to install it.
or:
zsh: bad CPU type in executable: ~/.espressif/tools/xtensa-esp32-elf/esp-2021r2-patch3-8.4.0/xtensa-esp32-elf/bin/xtensa-esp32-elf-gcc
Then you need to install Apple Rosetta 2 by running
/usr/sbin/softwareupdate --install-rosetta --agree-to-license
Installing Python 3
Based on macOS `Catalina 10.15 release notes`_, use of Python 2.7 is not recommended and Python 2.7 is not included by default in future versions of macOS. Check what Python you currently have:
python --version
If the output is like Python 2.7.17, your default interpreter is Python 2.7. If so, also check if Python 3 is not already installed on your computer:
python3 --version
If the above command returns an error, it means Python 3 is not installed.
Below is an overview of the steps to install Python 3.
Step 2 Download ROGO_ESP32_WILE_SDK
To get ROGO_ESP32_WILE_SDK, navigate to your installation directory and clone the repository with git clone, following instructions below specific to your operating system.
Open Terminal, and run the following commands:
.. code-block:: bash
mkdir -p ~/esp
cd ~/esp
git clone -b dev/v5.1.1 --recursive https://github.com/RogoSolutions/rogo-esp32-sdk.git
ROGO_ESP32_WILE_SDK is downloaded into ~/esp/rogo-esp32-sdk.
Alternatively you can also directly download from the ROGO_ESP32_WILE_SDK’s github page

Step 3 Install VScode extension and ROGO_ESP32_WILE_SDK
Download and install Visual Studio Code.
Open the Extensions view by clicking on the Extension icon in the Activity Bar on the side of Visual Studio Code or the View: Extensions command (shortcut: ⇧ ⌘ X or Ctrl+Shift+X.

Search for ESP-IDF Extension, and install it.

(OPTIONAL) Press F1 and type ESP-IDF: Select where to Save Configuration Settings, which can be User Settings, Workspace Settings or Workspace Folder Settings. Please take a look at Working with multiple projects for more information. Default is User settings.

In Visual Studio Code, Press F1 or select menu “View” and “Command Palette” and type [configure esp-idf extension]. After, choose the ESP-IDF: Configure ESP-IDF Extension option. You can also choose where to save settings in the setup wizard.

Now the setup wizard window will be shown with several setup options: Express, Advanced or Use Existing Setup.

Choose Advanced option, after ESP-IDF is downloaded and extracted, select to either download ESP-IDF Tools or manually provide each ESP-IDF tool absolute path and required environment variables.
> NOTE: Consider that IDF_PATH requires each ESP-IDF tool to be of the version described in IDF_PATH/tools/tools.json.
> If it is desired to use a different ESP-IDF tool version, check JSON Manual Configuration

Next step, the user will be asked how to install the ESP_IDF tools, the user can just leave the default option of Download ESP-IDF tools

Otherwise, if the user already installed the ESP-IDF tools, and want to use them , they can select Use existing ESP-IDF tools and provide the absolute path, please enter the executable container directory for each binary as shown below: > NOTE: Check JSON Manual Configuration for more information.

If everything is installed correctly, the user will see a message that all settings have been configured. You can start using the extension.

NOTE: The advance mode allows the user to choose to use existing ESP-IDF tools by manually entering each ESP-IDF tool absolute path. Make sure each ESP-IDF tool path doesn’t have any spaces.
Now that the extension setup is finally done, check the Basic use to learn how to use the SDK Configuration editor, build, flash and monitor your Espressif device.
NOTE: Visual Studio Code has many places where to set configuration settings. This extension uses the
idf.saveScopeconfiguration setting to determine where to save settings, Global (User Settings), Workspace and WorkspaceFolder. Please review vscode settings precedence.
NOTE: the setup wizard will install ESP-IDF Python packages and ESP-IDF debug adapter (
EXTENSION_PATH/esp_debug_adapter/requirements.txt) python packages. Make sure that if using an existing python virtual environment that installing these packages doesn’t affect your virtual environment. TheEXTENSION_PATHis:$HOME/.vscode/extensions/espressif.esp-idf-extension-VERSION
NOTE: Troubleshooting
Now since all requirements are met, the next topic will guide you on how to start your first project.
This guide helps you on the first steps using ESP-IDF. Follow this guide to start a new project on the |IDF_TARGET_NAME| and build, flash, and monitor the device output.
Note
If you have not yet installed ESP-IDF, please go to get-started-step-by-step and follow the instruction in order to get all the software needed to use this guide.
Start a Project
Now you are ready to prepare your application for |IDF_TARGET_NAME|. You can start with :example:`get-started/hello_world` project from :idf:`examples` directory in ESP-IDF. ```{eval-rst} .. important:
The ESP-IDF build system does not support spaces in the paths to either ESP-IDF or to projects.
cd [Path to SDK]/esp
cp -r $IDF_PATH/examples/get-started/hello_world .
Note
There is a range of example projects in the :idf:`examples` directory in ESP-IDF. You can copy any project in the same way as presented above and run it. It is also possible to build examples in-place without copying them first.
Open VScode, click on Espressif logo on the left panel, you will be greeted with a windows like this:
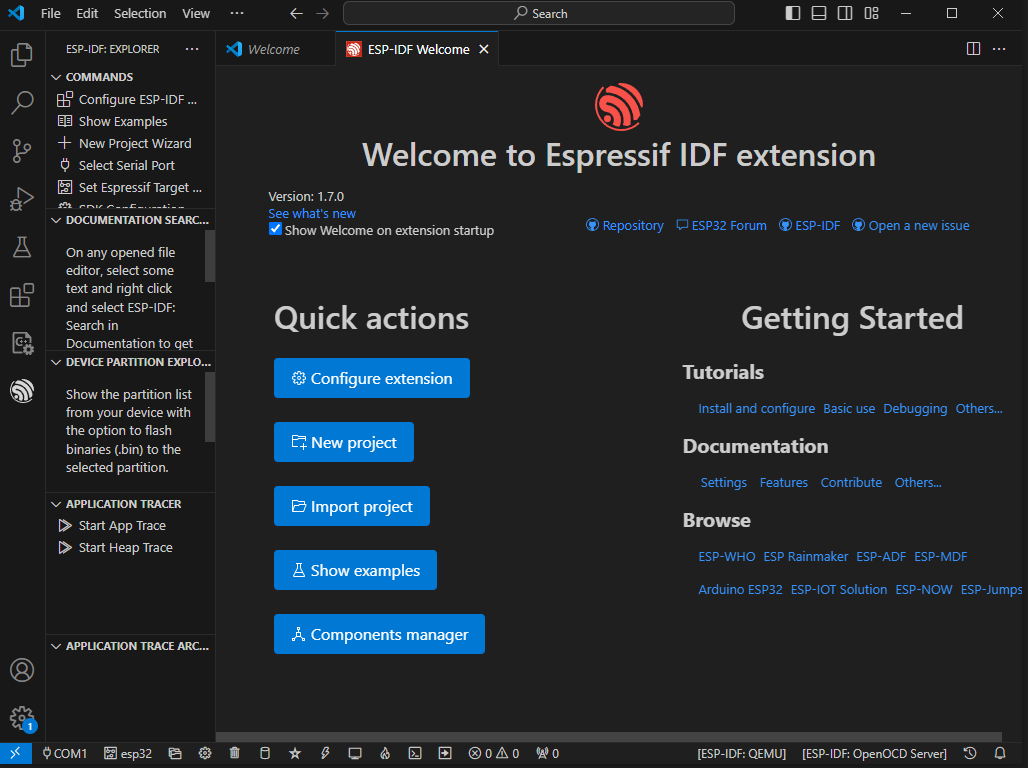
IDF extension - Homepage
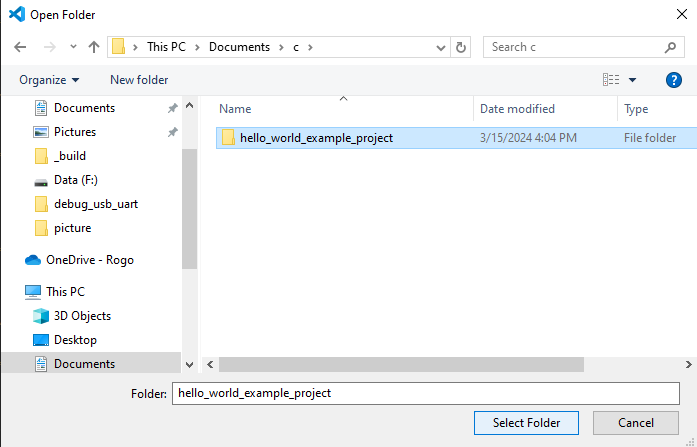
Click on import project , a prompt windows will show up, navigate to [Path to SDK]/examples/get-started/hello_world and select the desired example, which is hello_world:

Choosing example folder
Then choose the location where you want to save/copy the example project to:

Prompt to select folder
Then put in your project name.

Project configuration - WILE device - Factory board test
After that open the project folder you just created.

Project configuration - WILE device - Factory board test
Project configuration - WILE device - Factory board test
Connect Your Device
Now connect your |IDF_TARGET_NAME| board to the computer and check under which serial port the board is visible.
Serial ports have the following naming patterns:
Linux: starting with
/dev/ttymacOS: starting with
/dev/cu.macOS: starting with
COM
If you are not sure how to check the serial port name, please refer to establish-serial-connection for full details.
You can also see which serial ports are currently available by click on the serial port icon (🔌) at the tool bar of IDF extension, and choose your device serial port here
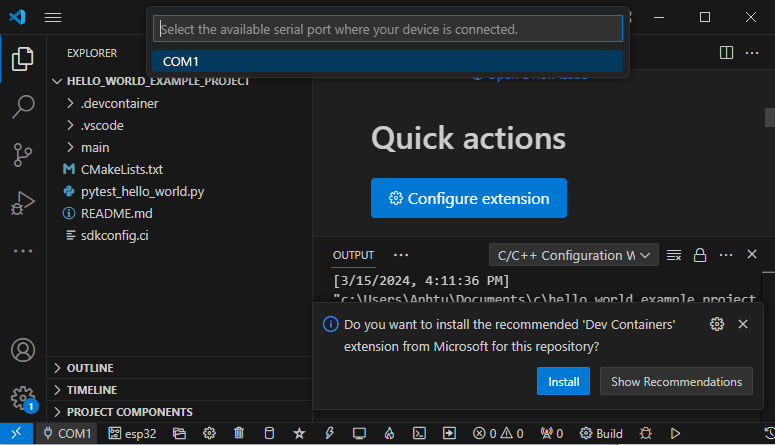
Serial Port listing and selection
Note
Keep the port name handy as it is needed in the next steps.
Configure Your Project
After opening a new project, you should first set the target with correspond to the hardware or chip module you are using .Note that existing builds and configurations in the project, if any, are cleared and initialized in this process. The target may be saved in the environment variable to skip this step at all. See selecting-idf-target for additional information.
Click on the `Set Espressif device target` icon, to select the correct ESP32 series you are using.
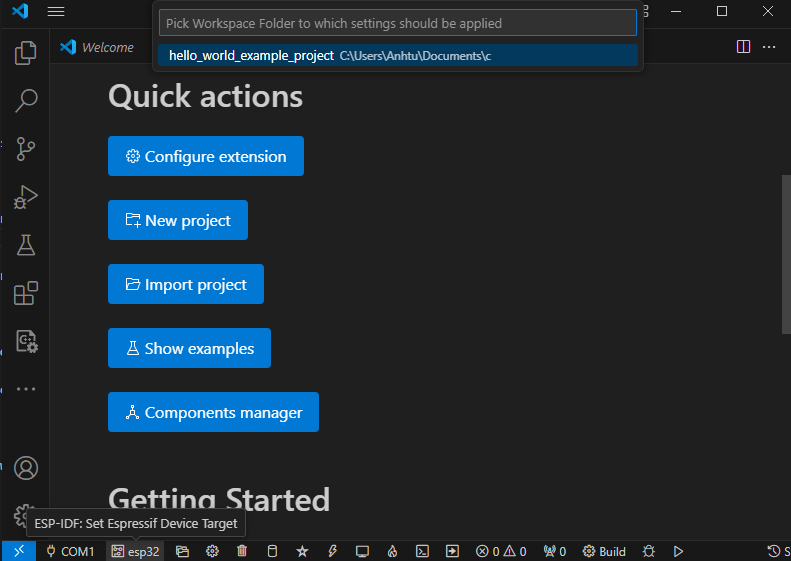
Set target device for the project
Click on the `SDK Configuration` icon (⚙) on the tool bar to run the configuration, and the menuconfig should show up like this
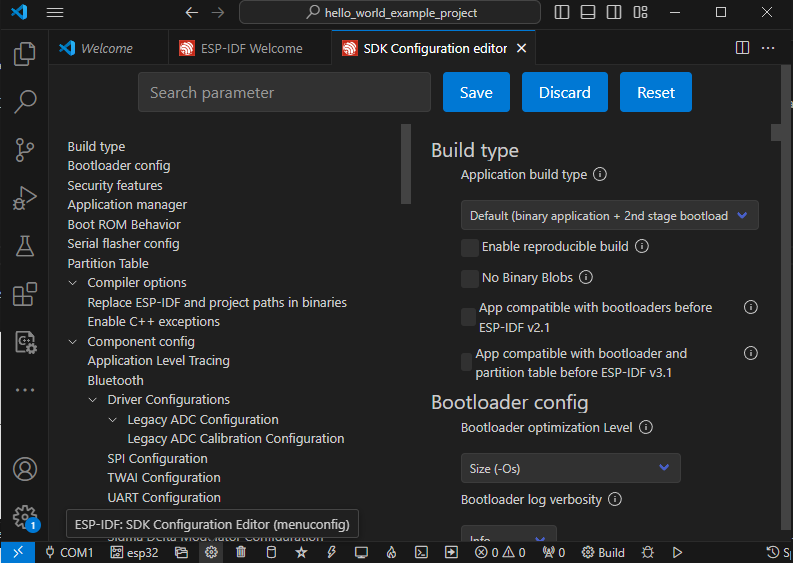
SDK Configuration (Menuconfig - GUI version)
You are using this menu to set up project specific variables, e.g., Wi-Fi network name and password, the processor speed, etc. Setting up the project with menuconfig may be skipped for “hello_world”, since this example runs with default configuration.
Note
The colors of the menu could be different in your terminal. You can change the appearance with the option --style. Please run idf.py menuconfig --help for further information.
Build the Project
Build the project by clicking build icon :
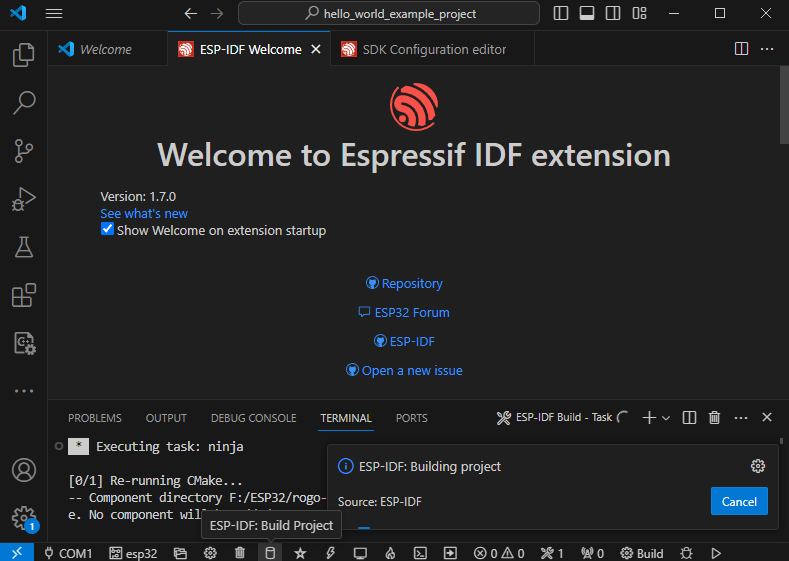
Build project
This compiles the application and all ESP-IDF components, then it generates the bootloader, partition table, and application binaries.
If there are no errors, the build finishes by generating the firmware binary .bin files with output like this.
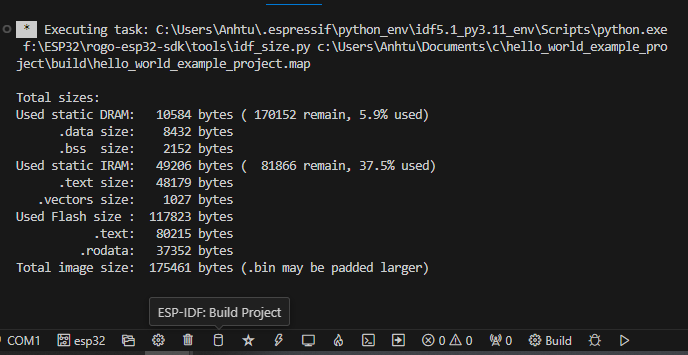
Build result
Flash onto the Device
To flash the binaries that you just built for the |IDF_TARGET_NAME| in the previous step, you need to run the following command:
idf.py -p PORT flash
Replace PORT with your |IDF_TARGET_NAME| board’s USB port name. If the PORT is not defined, the idf.py will try to connect automatically using the available USB ports.
For more information on idf.py arguments, see idf.py.
Note
The option flash automatically builds and flashes the project, so running idf.py build is not necessary.
Encountered Issues While Flashing? See the “Additional Tips” below. You can also refer to flashing-troubleshooting page or establish-serial-connection for more detailed information.
Normal Operation
When flashing, you will see the output log similar to the following:
...
esptool.py --chip esp32c3 -p /dev/ttyUSB0 -b 460800 --before=default_reset --after=hard_reset write_flash --flash_mode dio --flash_freq 80m --flash_size 2MB 0x8000 partition_table/partition-table.bin 0x0 bootloader/bootloader.bin 0x10000 hello_world.bin
esptool.py v3.0
Serial port /dev/ttyUSB0
Connecting....
Chip is ESP32-C3
Features: Wi-Fi
Crystal is 40MHz
MAC: 7c:df:a1:40:02:a4
Uploading stub...
Running stub...
Stub running...
Changing baud rate to 460800
Changed.
Configuring flash size...
Compressed 3072 bytes to 103...
Writing at 0x00008000... (100 %)
Wrote 3072 bytes (103 compressed) at 0x00008000 in 0.0 seconds (effective 4238.1 kbit/s)...
Hash of data verified.
Compressed 18960 bytes to 11311...
Writing at 0x00000000... (100 %)
Wrote 18960 bytes (11311 compressed) at 0x00000000 in 0.3 seconds (effective 584.9 kbit/s)...
Hash of data verified.
Compressed 145520 bytes to 71984...
Writing at 0x00010000... (20 %)
Writing at 0x00014000... (40 %)
Writing at 0x00018000... (60 %)
Writing at 0x0001c000... (80 %)
Writing at 0x00020000... (100 %)
Wrote 145520 bytes (71984 compressed) at 0x00010000 in 2.3 seconds (effective 504.4 kbit/s)...
Hash of data verified.

Leaving...
Hard resetting via RTS pin...
Done
If there are no issues by the end of the flash process, the board will reboot and start up the “hello_world” application.
If you would like to use the Eclipse or VS Code IDE instead of running idf.py, check out Eclipse Plugin, VSCode Extension.
Monitor the Output
To check if “hello_world” is indeed running, type idf.py -p PORT monitor (Do not forget to replace PORT with your serial port name).
This command launches the IDF Monitor application:
$ idf.py -p <PORT> monitor
Running idf_monitor in directory [...]/esp/hello_world/build
Executing "python [...]/esp-idf/tools/idf_monitor.py -b 115200 [...]/esp/hello_world/build/hello_world.elf"...
--- idf_monitor on <PORT> 115200 ---
--- Quit: Ctrl+] | Menu: Ctrl+T | Help: Ctrl+T followed by Ctrl+H ---
ets Jun  8 2016 00:22:57

rst:0x1 (POWERON_RESET),boot:0x13 (SPI_FAST_FLASH_BOOT)
ets Jun  8 2016 00:22:57
...
After startup and diagnostic logs scroll up, you should see “Hello world!” printed out by the application.
    ...
    Hello world!
    Restarting in 10 seconds...
    This is {IDF_TARGET_PATH_NAME} chip with {IDF_TARGET_SOC_CPU_CORES_NUM} CPU core(s), {IDF_TARGET_FEATURES}
Minimum free heap size: {IDF_TARGET_HEAP_SIZE} bytes
    Restarting in 9 seconds...
    Restarting in 8 seconds...
    Restarting in 7 seconds...
To exit IDF monitor use the shortcut Ctrl+].
Note
You can combine building, flashing and monitoring into one step by running:
idf.py -p PORT flash monitor
See also:
IDF Monitor for handy shortcuts and more details on using IDF monitor.
idf.py for a full reference of
idf.pycommands and options.
That is all that you need to get started with |IDF_TARGET_NAME| !
Now you are ready to try some other :idf:`examples`, or go straight to developing your own applications.
Important
Some of examples do not support |IDF_TARGET_NAME| because required hardware is not included in |IDF_TARGET_NAME| so it cannot be supported.
If building an example, please check the README file for the Supported Targets table. If this is present including |IDF_TARGET_NAME| target, or the table does not exist at all, the example will work on |IDF_TARGET_NAME|.
Additional Tips
Permission Denied Issue
With some Linux distributions, you may get the error message similar to Could not open port <PORT>: Permission denied: '<PORT>' when flashing the |IDF_TARGET_NAME|. This can be solved by adding the current user to the specific group, such as dialout or uucp group.
Python Compatibility
ESP-IDF supports Python 3.8 or newer. It is recommended to upgrade your operating system to a recent version satisfying this requirement. Other options include the installation of Python from sources or the use of a Python version management system such as pyenv.
Flash Erase
Erasing the flash is also possible. To erase the entire flash memory you can run the following command:
idf.py -p PORT erase-flash
For erasing the OTA data, if present, you can run this command:
idf.py -p PORT erase-otadata
The flash erase command can take a while to be done. Do not disconnect your device while the flash erasing is in progress.